 Page 3


Lab 4
Page 3
Now it's time to experiment with Paint Shop Pro, a popular graphics program.
You should see a large window with a few toolbars across the top and an empty dark gray area in the center. This center area is where your images will appear when you edit or create them.
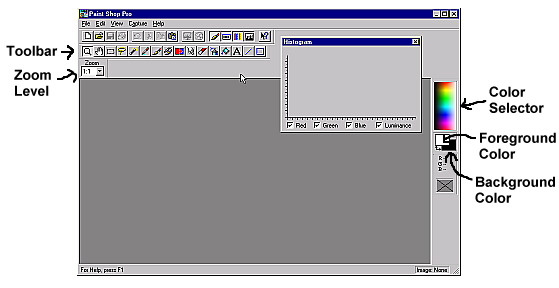
To the left, you should see the Zoom Level control. You will be able to use this to zoom in and out of your image. On the right, there is a color selector. By clicking on the color you wish to use in the palette, you can cause it to be the foreground color. This is the color that will be used when you draw with the paintbrush. By right-clicking, you can adjust the background color which is the color used for fills and some other changes.
You may also notice a "Histogram" window. You will not need this right now, so feel free to close it by clicking on its "X".
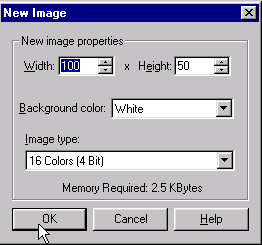
A large window should appear, filled with the background color you chose. If your Paintshop Window was not large enough for it, it may have automatically zoomed out. Be sure the Zoom Level is set to "1:1". This large area is your canvas. Using the different tools available, you can paint on it with the mouse.
If you are unsure what a particular tool does, hold the mouse over its button and look at the description given in the bottom left corner of the window. If you make mistakes, just choose "Undo" from the Edit menu to undo your last stroke or action.
Here are brief descriptions of a few of the tools available:
 | Lets you zoom in and out of pictures |
 | Lets you drag around selected areas of your image |
 | Lets you select rectangular areas of your image |
 | Lets you select non-rectangular areas of your image |
 | Lets you take a color from your image and put it on the palette as either the foreground color (if you left-click) or the background color (if you right-click) |
 | Lets you paint (check out the different sizes and options available) |
 | Lets you smudge, blur, brighten etc.. as though you were painting |
 | Lets you get a spray paint effect |
 | Fills in an area with the foreground color |
 | Lets you type text into your picture |
 | Lets you draw lines |
 | Lets you draw shapes (not just rectangles) |
Now lets play with the size of your picture. Be sure that your image is selected (its titlebar should be dark).
One way to make an image smaller or larger is to shrink or enlarge it
This should change your picture to a new size. If you clicked on the checkbox next to "Maintain aspect ratio", then the picture should look larger or smaller but the same otherwise. If you didn't then it is likely that your picture got stretched or squeezed in one dimension.
Unlike resizing, cropping an image will make it smaller by cutting off the edges.
Notice that anything outside that box has been cut off from your picture.
Finally, you can change the picture back to its original size without enlarging the part you have drawn.
This should have increased your drawing area. The new space is filled with the current background color.
If you are saving your file as a JPG, it is very important that you check the current compression rate in the following way:
| PREVIOUS | 1 | 2 | 3 | 4 | 5 | 6 | 7 | NEXT |