
|
|
COS 429 - Computer Vision |
Fall 2019 |
| Course home | Outline and Lecture Notes | Assignments |
Sliding-window: Now that you have a face classifier trained, the next step is to run the classifier on a bunch of locations within an image. A "sliding window" detector does this by brute force: it considers every (36x36, in our case) window of pixels, computes the HoG descriptor on it, and runs it through the classifier. In practice, advancing the detection window by one pixel at a time is very slow and probably unnecessary. So, you can have a "stride" parameter, which is how much the window should be advanced each time. For example, for a stride of 3, you would consider windows starting at (1,1), (4,1), (7,1), ..., (1,4), (4,4), (7,4), etc.
The output of this detector is a probability map similar to the one shown below.
 |
 |
Input image | Face probability map |
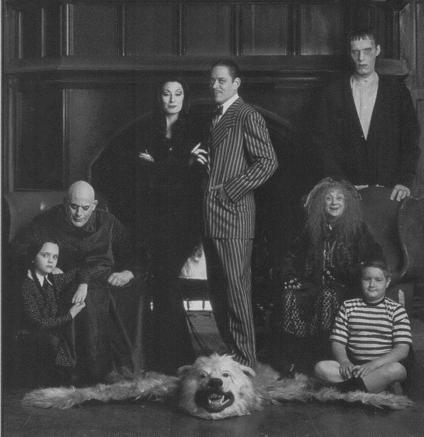
You can now do the usual sorts of postprocessing: simple thresholding, nonmaximum suppression, etc. Here are the faces detected by thresholding at a probability of 0.95 (with stride = 3):
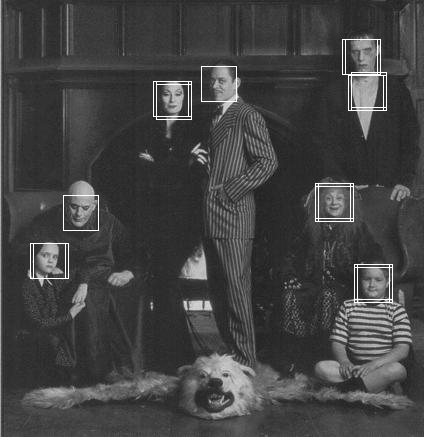
Notice the multiple overlapping detections: nonmaximum suppression would be necessary to get rid of them. Also notice the false-positive detections on Lurch's shirt. The shirt shows up quite strongly in the probability map, and the training data contains a number of low-contrast faces, so it might be difficult to eliminate this false positive.
Do this:
np.savez('face_classifier.npz', params=params, orientations=orientations, wrap180=wrap180)
These variables can then be read back via np.load('face_classifier.npz'), as is done by the starter code below.
Do this and turn in:
import cv2Submit your file find_faces_single_scale.py
import numpy as np
import matplotlib.pyplot as plt
from find_faces_single_scale import find_faces_single_scale
img = cv2.imread('face_data/single_scale_scenes/addams-family.jpg', cv2.IMREAD_GRAYSCALE)
saved = np.load('face_classifier.npz')
params, orientations, wrap180 = saved['params'], saved['orientations'], saved['wrap180']
outimg, probmap = find_faces_single_scale(img, 3, 0.95, params, orientations, wrap180)
plt.figure(1)
plt.title('outimg')
plt.imshow(outimg, cmap='gray')
plt.show()
plt.figure(2)
plt.title('probmap')
plt.imshow(probmap, cmap='gray')
plt.show()
Optional extra credit (up to 2 points each):
In your writeup, clearly specify which extra credit items you attempted. Be sure to submit all code, along with a description of your method and an analysis of the results. The amount of credit will depend on the sophistication and thoroughness of your implementation and analysis.