 Page 6


Lab 4
Page 6
Image Maps are images included in web pages which have different clickable parts that link to different places. Try out the following image map:

Right-click on the above picture and choose "View Image". You should notice that the whole thing is one picture (even the buttons). Basically, to create a picture, you must create an image with a bunch of different rectangular parts that look like they should lead to other pages. Then, inside your HTML file, you can specify which areas of the picture should link to which pages.
Before you start creating your own image map, look for a few examples on the Web. Any time you can click on different parts of a single image in order to go to different pages, that is an image map. One example to get you started is the big image at the top of the Warner Bros. Homepage. The web sites of most large corporations will also have image maps.
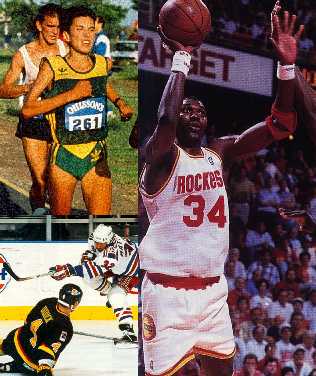
For our example below, we chose one picture and then created rectangular sections within it. Review this example and then With Paint Shop, create your own image with several rectangular pictures or areas which could lead to different links. Then save it to your public_html directory. Be sure to save it as a GIF or JPG file so that it can be displayed on the WWW.
Do not make a picture that looks exactly like this one. Design your own image map!


To make your image map work, you need to know the pixel coordinates (x, y) of the top left corner and the bottom right corner of each box that you wish to make into a link. Below, we've shown a few of the values for the rectangles in our example:

To find the coordinates of the boxes in your image, do the following:
Just for reference, here are the pixel values for OUR example:
Once you've created the image and found the coordinates for each box, you need to put all of that information in your HTML file. Look at our example and then follow the instructions to write the HTML code for your the image map you are creating.
For our example, we used the following HTML code:
<IMG SRC= im6.jpg USEMAP = #imagemap>
<MAP NAME="imagemap">
<AREA SHAPE="rect" COORDS = "0, 0, 128, 53"
	HREF=http://www.cs.princeton.edu/courses/archive/spr00/cs111/>
<AREA SHAPE="rect" COORDS = "0, 53, 128, 106"
	HREF=http://www.cs.princeton.edu/courses/archive/spr00/cs111/descrip.html#RQ-LB>
<AREA SHAPE="rect" COORDS = "0, 106, 128, 159"
	HREF=http://www.princeton.edu/Siteware/CampusServices.shtml>
<AREA SHAPE="rect" COORDS = "0, 159, 128, 212"
	HREF=http://www.cs.princeton.edu/courses/archive/spr00/cs111/STUDENTS.html>
<AREA SHAPE="rect" COORDS = "0, 212, 128, 265"
	HREF=http://www.cs.princeton.edu/courses/archive/spr00/cs111/descrip.html#SC>
</MAP>
First, we included the image with the IMG tag just like any other image, except that we told the browser where to find its map (with the attribute USEMAP). Then, we used the MAP tag to start a map section called "imagemap". Next, for each box, we included an AREA tag with the shape, coordinates and appropriate link. Finally, we closed the MAP tag with </MAP>
At the place in your HTML file where you would like your Image Map to be, type the following line:
<IMG SRC = "myimage.jpg" USEMAP = #MyImageMap>Replace "myimage.jpg" with your image's filename. This will display your image just like any other image you have included in your web page. The USEMAP attribute, however, will let the browser know that this image is an image map and will tell it where to find the information it needs to make all of the links inside it work properly.
Once you have placed the image, you need to include a section somewhere within the HTML file that contains that mapping information. Copy the following lines to your HTML file:
	<MAP NAME="MyImageMap">
	<AREA SHAPE="rect" COORDS = "x1, y1, x2, y2" HREF = "link.html">
	</MAP>
The first of these lines tells the browser that everything it sees until the </MAP> tag will be information about the links in an image map named "MyImageMap". The second line gives link information for one rectangle in your picture. Follow these directions to fill in information for all of your rectangles.
Congratulations! You should now have a working image map (which you will need to submit). If you are ambitious, you may want to create a more interesting image map with all sorts of different shapes. Follow this link for an example. There are many resources out there which can teach you how to do this, so search for one if you would like to try.
It is important to realize the difference between image maps and picture links. A picture link, is simply a link, which has a pciture rather than text as the "clickable" region. With an image map, more can be done - one can divide the image into sections, and treat each section separately - this cannot be done with a picture link. The similarity is that in each case, a "button" is nothing more than a picture, until the HTML tags are put in to make it a link.
| PREVIOUS | 1 | 2 | 3 | 4 | 5 | 6 | 7 | NEXT |