Linux / Debian Tutorial
During previous semesters, this assignment has caused students with weak *nix experience a lot of grief. This tutorial is intended to address such problems by pointing out and solving some of the most common problems. It is not intended to be an all encompassing document. Much like the BigInteger <-> byte[] interconversion issues that we subjected you to during the RSA assignment, sometimes you learn best by having to grapple with vexing technical issues on your own. Ideally, this tutorial wouldn't exist, and you'd go through and figure it all out the hard way (since this is a really useful skill) -- but given that you only have two weeks to complete the assignment, we figured a little more guidance was in order.
If you get stuck, please don't hestitate to ask. There's no bigger waste of your time than spending hours googling to find the very minor tweak to the command that will unlock the next phase of the assignment. This tutorial assumes you have at least a basic knowledge of Linux. If this is not the case, and you are confused, please post on Piazza and we'll help you out -- please don't be afraid to ask even basic questions.
Installing Debian using Virtual Box and Sharing with your Host OS
It is possible to complete this assignment without using Linux. Howver, in many cases, the most powerful, easiest to use, an/or well-documented tool is going to be Linux based. Furthermore, all of the TAs have completed the assignment using Debian Linux, and thus we'll be focusing our support efforts on this platform. It is fine, of course, to use Linux for some tasks and your usual operating system for others. The choice depends on the task at hand and the tools you choose to use.
As we're well aware, very few of you are probably running Linux on your machine, hence the need for VirtualBox if you want to use our recommended platform.
VirtualBox is further proof that we live in the future. Using very powerful and free tools such as VirtualBox, it is quite easy to run a guest operating system as a process of your host operating system. The guest OS will run, having no idea that it's just a simulation (this isn't QUITE true, there are a few ways that it can tell). And as an added bonus, the full state of that entire guest computer exists as a file on your actual computer's hard drive, which can be backed up, shared between group members, etc. The guest machine will be a bit slower, sure, but it'll be close to the speed of your host machine.
To install Debian as a guest machine on your actual real host machine, follow the steps below.
- Download and install Virtual Box for your host operating system.
- Download a Debian installation .iso. The main download page can be found here. You probably want the "Small CD". If you're on a 64 bit machine, pick the amd64 image (http://cdimage.debian.org/debian-cd/6.0.6/amd64/iso-cd/debian-6.0.6-amd64-netinst.iso). Despite the confusing name, this is the one you should use if you're using an AMD or Intel processor. If you're on a 32 bit machine OR you aren't sure if you have a 64 bit or 32 bit machine, pick the i386 image (http://cdimage.debian.org/debian-cd/6.0.6/i386/iso-cd/debian-6.0.6-i386-netinst.iso). If you're on some weird computer, download the appropriate image for your bizarro architecture (and post on Piazza, because I'm curious).
- Start up VirtualBox and create a new machine using the big blue button on the top left. In the box which asks for Version, if you have the 64 bit image, pick "Debian (64 bit)", otherwise pick the one that just says "Debian". The default amount of memory should be fine (you can always change this later). Create a hard drive file in VDI format that is dynamically allocated. You'll want to allocate at least 2 gigabytes, though you might consider using around 10 GB (if you want to store the forensics_release.vdi file on your Debian machine instead of sharing the file with your host OS).
- Start the machine and virtually insert the Debian installation file into the virtual DVD drive. This can be done in one of two ways:
a. When you try to start the machine, you should get a prompt that asks for an installation file. Point it to the .iso that you downloaded. VirtualBox will take it from there.
b. If you cancel this prompt (or it doesn't appear), you can manually add a virtual DVD drive that will contain the .iso. To do this, go to the main VirtualBox menu (the one where the "new" button was). Click on your new machine, then click Settings. From there, go to Storage. You should see a list of devices under the control of an "IDE Controller". Click on the one that has an icon of a CD. Then in the top right, you'll see a box that says "CD/DVD Drive: [some text]", and next to that text, there will be an image of a CD. Click on that, and browse to the appropriate file.
- The Debian installer should begin. Select all of the default options. Everything is happening inside the simulated computer inside the VirtualBox, so don't worry about the safety of your real hard drive. The entire process should only take a few minutes.
- Linux is installed. Problem Solved.
The glory of your present situation is that you may now Google the answers to any of your questions in the context of Debian Linux. You do not have to worry about Windows or Mac OS or whatever other weird operating system you may really be running. Furthermore, we now all have a standard platform that we can help out with.
- One handy thing you should probably immediately do is to enable the Shared Clipboard. You can find this option under the "Devices" tab in VirtualBox. If you select "Bidirectional" then anything that you copy on the host OR guest can be pasted on the host OR guest.
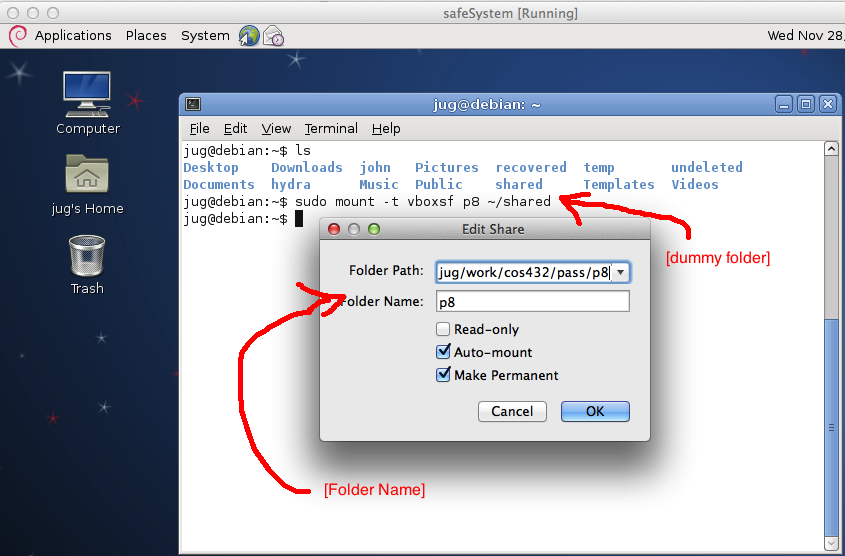
- You can share a folder between your host and guest operating system. To do this, create the folder on your host (if you haven't already). Then, go to "Settings" for your machine (from the main VirtualBox menu). The far right tab is called "Shared Folders". Click on the button for "add a folder". Under "Folder Path", give the path on your host. Under "Folder Name", pick any arbitrary string. Leave Auto-Mount unchecked. If there is "Make Permanent" option, enable this option.
After your machine has been started, create a dummy folder on your virtual machine. You can mount this folder using the following command, where [Folder Name] is whatever name you picked for "Folder Name" under VirtualBox, and where [dummy folder] is the location of the dummy folder you just created:
sudo mount -t vboxsf [Folder Name] [dummy folder]
For example, on my machine, this command is sudo mount -t vboxsf p8 ~/shared.
This command is a bit of a glitch in the matrix; I don't quite understand how it works. mount makes a call to mount.vboxsf, which is a Debian utility for mounting virtual box shared folders. It is unclear to me how this utility interfaces with VirtualBox on the host machine, but somehow it does.
After running this command, the folder ~/shared will act just like the folder on your home computer. cd to this folder, and you can see (and modify) all the files in the folder on the host machine. These files will not count as used space on the guest computer. Shared folders are handy if you've already downloaded forensics_release.vdi, and don't want to download it again from inside the guest computer, or if you'd like to be able to share your Debian VDI with your groupmates without having to include forensics_release.vdi when you copy the VDI file.
If you'd like to be able to share the image file with your group members, pick the 32 bit image, which will work fine on any computer. You probably won't notice the difference anyway (except MAYBE if you're doing password cracking or similar).
Installing Linux software
As you're probably familiar, installing software in Windows or Mac OS X is typically very simple. One downloads a special-purpose installer that installs all needed run-time dependencies, puts a precompiled binary file into the appropriate directory, and tells the operating system everything it needs to know about the new software. By stark contrast, many Linux tools require compilation from source code for installation, many of which have compilation and run-time dependencies. This document provides a very introductory guide to intalling Linux software.Using a Package Manager
The easiest way to install software in Debian is using the built in package manager, called APT. As an example, to install the vim text editor, one would enter the command shown below.
sudo apt-get install vim
The "sudo" part means to run the command as an administrator (or more specifically, as the user named "root"). Once entered, apt-get will download a pre-compiled vim binary and all its dependencies, place them in /usr/bin (because the vim package tells it to install there), and the package manager will make sure /usr/bin is in the path. Voila. Many of the tools that you might want to install for this assignment can be installed using apt-get. A word of warning: the version of John the Ripper available via APT is significantly out of date.
A more thorough description of APT can be found at this link.
Installing from source
Some programs will require you to manually compile the source code. When you download such a program, it will probably have a README or INSTALL file that tells you how to compile the software. The most common installation workflow is described below.
configure, make, make install
This is the most popular way to install software from source. From the appropriate directory, you first run "./configure". This will ensure that your system is ready to install the program of interest, and will generate a make file to be used during the compilation process. After running "./configure", the next step is to type "make", which will compile the program according to the directives given in the makefile. The final step is the "make install" command, which puts the compiled binaries into the appropriate location on your computer. You may have to perform this step as root, in which case you should use "sudo make install" instead.
A somewhat more thorough of this process can be found at this link.
Other workflows
Some software does NOT use the canonical workflow described above for compilation. For example, John the Ripper utilizes another common work flow wherein you must manually specify the target operating system during the compilation process. For such software, you should consult the INSTALL or README file that comes with the source code. Learning how to install such software is a really useful skill, so I'll leave you to struggle with this a bit. Post on Piazza or email your TA if you get stuck.
Copyright 2012, Josh Hug.