
If you do this or any other lab elsewhere, when things don't work or when you get into trouble and can't figure out what's wrong, you're on your own.
We realize that for many of you, much of this lab will seem incredibly familiar and trivial, but for others, some or even all of it will be new. If you don't know much about computing, follow the steps in order and ask a TA for assistance at any time. If you've never used this kind of computer or system before, find a TA to help you get started and be prepared to spend a little more time this week than you will for future labs. If there are parts which you already know how to do, however, go over them quickly and move on.
Since software and hardware change every year, often in subtle ways, inevitably something won't work right. If you find something wrong with the instructions, please let us know. Thanks.
Part 2: Using Windows
What exactly is Windows?
Windows is an operating system, which is a program that manages the resources of a computer for you. It lets you run programs like browsers and word processors and Kazaa; it lets you store and retrieve information on disks; it lets you use peripheral devices like printers and joysticks and speakers; and it lets you communicate with other machines via a network.
"Windows" is a family of operating systems from Microsoft. Microsoft cranks out a new version every year or two; Windows 2000 is barely two years old, and Windows XP has been around for nearly a year. Unix, Linux, MacOS and PalmOS are also operating systems, not from Microsoft, that all perform the same basic functions, though with myriad differences in style, philosophy, and details.
One of the main functions of an operating system is to provide an environment in which you can run programs. Most operating systems allow you to run several programs at once, switching your attention from one to another at will. Some like Unix are text-based and mostly controlled by typing on the keyboard. Others (Windows, MacOS, PalmOS) are graphical and are most often controlled with a mouse or pen.
Logging on
To begin using Windows you must log on, which lets the computer know that you are a valid user and gives you access to your own information. Windows 2000 keeps track of its users and can remember specific preferences for each of them. This is particularly important in the computing clusters, where the machines are shared among lots of different people. In that case, the operating system has to make sure that you can access your own information, but no one else's. Some aspects of this will be investigated in this lab.
Follow these instructions to log in to Windows. If you're using
Windows 95/98/ME/XP, you probably won't have to log in, since you are
the sole user.
There's good advice on how to choose a password on the web; for example, check out OIT, IIT, and MIT, three pages out of thousands.
After a few moments, you should see the Windows desktop with a bar across the bottom of the screen and several icons scattered across the left. Congratulations! You've successfully logged on. Remember these steps, because you will need to log on again at the beginning of every lab.
Using the Desktop
Now it's time to explore Windows. If you've used Windows before, this will be familiar. If you're a Mac users, you'll recognize all of the ideas but the details will sometimes be disconcertingly different. In any case, just use the mouse to click on buttons, icons and anything else that looks interesting until you feel confident with the way things work. Keep the following in mind as you experiment:
- Icons - Windows and other graphical operating systems
use icons as shortcuts to run programs. Sometimes these
shortcuts represent the programs themselves, and sometimes they
represent files or documents used by those programs.
Either way, double-clicking on the icon should start the
associated program.
- Double-Click on the "Cluster Computer" icon.
(On other Windows systems, it is usually called "My Computer" instead.)
This should bring up a window with several different icons representing disk drives and other resources on your computer. Generally the icon labeled C: is the local disk (that is, the disk physically in the machine you are using), A: is the floppy drive, D: or E: is the CD-ROM. There may also be some "network drives", which are connections to disks on other computers.
Double-click any of these icons. You should see another window (or a fresh view in the current window) listing files on that drive. This is one way to see all the files that are on your computer.
- Individual Windows - Now you probably have several
windows cluttering up your screen. Each Windows window has a
colored stripe across the top and a thin frame around the edges.
The stripe is called the titlebar and is used to
minimize, maximize, restore and destroy the window.
It also shows the title of the program (or folder) and sometimes
information about what that program is working on.
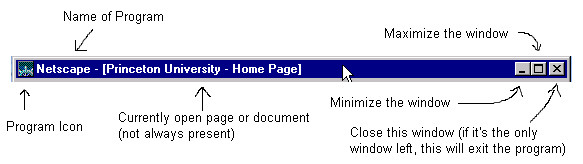
Maximizing a window will cause it to take up the entire screen, blocking out all other windows. When a window is maximized, the maximize button will be replaced by a Restore button. Clicking that will cause the window to return to normal size. Minimizing the window will cause it to go away temporarily, leaving only a button on the Taskbar (see below). To restore a minimized window, simply click on its button on the Taskbar. Minimizing a program does not stop it, it simply frees up space on your screen.
You can also change the size of a window by selecting its rim or corners with the mouse and dragging (holding down the left button and moving the mouse) them to the desired size. You can move the entire window by clicking on an empty part of the titlebar and dragging it to where you want.
Finally, when you are finished with a window or program, you can stop it by clicking on the "X" button in the top right corner. You can also usually stop it by clicking on the "File" menu beneath the titlebar and choosing "Exit".
- Taskbar - This long bar at the bottom of your screen
is the main tool for managing windows in Windows.
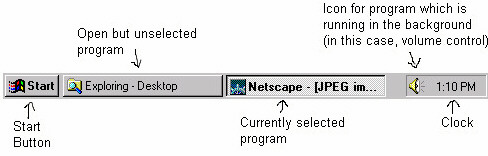
On the far left is the Start Button (explained below). Next, there should be a long button for each currently open program or folder. One of these buttons may look depressed (or at least a little unhappy), indicating which window is currently selected. Some of these buttons will correspond to windows you can see on your screen. Others represent minimized programs and only expand to a visible window when you click on them. As you proceed in this lab and open more and more programs, each should appear on the taskbar. You can switch among them at any time by clicking the appropriate program on the taskbar.
At the far right of the task bar, there are a few small icons and a clock in an area known as the "tray". These icons represent programs which are running in the background (without using a window), such as volume control and an anti-virus program. Try clicking with the right and left mouse buttons on some of these to see what happens.
- Start Button - The Start Button is used to start
programs, find files, change settings or shut down the computer.
Try clicking on the Start Button now. A menu should pop up with
7 or more different options. Some of these have arrows at the
right, indicating that they lead to other menus instead of
windows. For example, when you select Settings, you will see
three more options which you can then select. An instruction to
select "Settings | Taskbar" would mean to select Settings and
then Taskbar.
The following options should be available on your Start Menu:
- Programs - This is where you can find programs such
as Netscape and Word.
Documents - This is a list of recently used data files. Selecting one of these will start the program that is associated with that file. For instance, if you select a file that ends in ".html", Windows will start a web browser (like Netscape) to view it.
Settings - This is where Windows stores information about everything from which printers are connected to which color scheme you prefer. Try not to change these settings unless you know what you're doing.
Search - With this option, you can search for a file by name, even if you don't know where it is stored on the computer.
Help - When you're really stuck, there's always Windows help, though you're often better off asking someone else who knows what's going on.
Run - With this option, you can start programs by typing in their location on the computer. For example, typing in "c:\windows\notepad.exe" will start a program called Notepad which is in the "windows" folder on the C drive. In fact, you can usually get by just typing "notepad" in the Run dialog box; Windows fills in the rest for you.
Shut Down - Selecting this will give you the option to restart the computer, shut down the computer, or log off of Windows. You should end every lab by selecting Shut Down and then, in the window that appears, choosing "Log off your-name".
Editing and Saving with Notepad
One of the tasks you do most often on the computer is word processing. There are numerous ways to do this, as we will see in this lab. You are perhaps most used to using Microsoft Word to process documents. Notepad is an alternative editor of much more limited capabilities. Notepad cannot do as many things as a word processor like Word but it is much simpler, loads much more quickly and is very useful for small notes and documents (just like a small paper notepad). It also saves information in a standard format that can be easily used by other programs. For the rest of this lab, you will use Notepad to record your work as you go along, and then copy it into an email at the end.
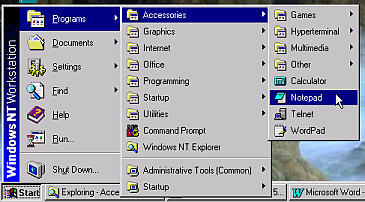
Open Notepad by choosing "Programs | Accessories | Notepad" from the Start Menu, or by typing "notepad" into the Run dialog box. A window should appear with a blinking cursor. Click on the various menus (File, Edit, Search and Help) to see what options are available. Experiment with typing text and editing it with the mouse and with items from the Edit menu; be sure you're comfortable with the Cut, Copy and Paste features, since they get used in a lot of different situations.
Do this to begin collecting data for submission:
- Type a line with your name and email address.
- Type a second line naming the operating system you are using for this lab (e.g., Windows 2000).
- Select "Save" from the "File" Menu.
You should see a window like this:
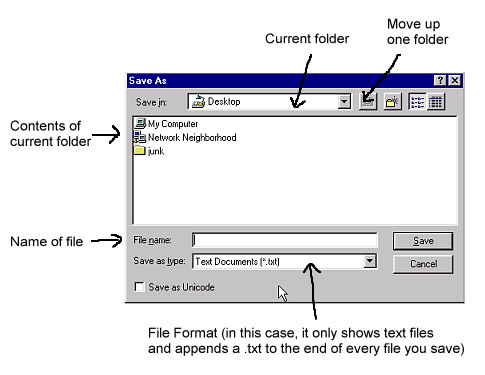
The top half of this window tells you where on the computer you are saving your file. At the very top, you should see the name of the currently open folder. This may be "Desktop", "C:\" or just about anything else. The contents of the folder should be listed in the box below. Double-clicking on a folder in that box will open it so you can see what it contains. Double-clicking on a file name will cause that file's contents to be replaced by your new content.
Remember, however, that if you have a file format selected (below the file name) then you may not see all of the files in a particular folder. For instance, if you've selected the file format "Text Documents (*.txt)", then inside each folder, you will only see other folders and files whose names end with ".txt". This can be useful in a folder containing dozens of files, but may be confusing at times. By clicking on the white text box next to "Save as Type" and selecting "All files", you can force it to make all files visible, regardless of their extensions.
At the top right are several buttons. The first will move you up one directory/folder to the parent folder. Click this button until you are in the Desktop folder. The second button creates a new folder inside the current folder. The other buttons toggle the display -- try pressing each to see what happens.
Now follow these instructions to save your file:
- If you are not in the Desktop folder, move to it by either pressing the up-directory button several times or clicking on the current folder name and choosing "Desktop" from the list.
- Make sure that "Save as Type" is set to "Text documents (*.txt)".
- Type the name lab1.txt next to "File Name", in lower case!
- Press "Save" to save your file lab1.txt to the Desktop.
Because the Desktop is a special folder meant to represent a real desktop, all of the files you save to it will show up on the Windows Desktop as icons. If you move your other windows out of the way or minimize them, you should see an icon for your new file.
Leave Notepad running. You will be adding content to this file for the rest of the lab. Each time you add something, save the file; this protects you (mostly) in case something goes awry, and is always a good idea.
Part 3: Exploring the File System
A file system is how the operating system organizes all the data that is stored on the computer, in a form that is convenient for users to save information, organize it, and retrieve it as needed. The same organizing structures that are useful for the information on a hard disk are also useful for removable media like floppy disks and CD-ROMs, and even for information physically stored on other computers and accessed through a network, so all of these are packaged as file systems as well. Even though the physical structures vary a lot, the operating system makes them all look the same.
Information in a file system is organized hierarchically: at the top level is a set of folders (often equivalently called directories) and files. A folder contains the names of files and folders that are grouped together for some purpose. A file holds specific information, such as a Word document, a spreadsheet, a mail message, a picture, an MP3 song, or a program like Word itself.
On Windows, the usual organization creates a file system on the computer's hard drive, in a folder called (for ancient historical reasons) "C:". For even more ancient reasons, the floppy drive is called "A:". If there is a second hard drive, it is usually D:, and if there is a CD-ROM drive, it takes the next letter, and is thus either D: or E:.
Other "drives", like network connections, have even more arbitrary letter names; at Princeton, student files can be stored in a big file system on a central OIT machine and your part of that file system is accessible from a PC or Mac as the "H:" (for "home") drive.
There are a variety of way to explore the contents of these file systems. The simplest, though not the most flexible, is to double-click on "Cluster Computer" or "My Computer", then double-click on one of the icons therein. That will uncover more icons for files and folders. Each double-click on a folder expands its contents.
A double-click on a file, however, typically executes a program that is associated with the presumed type of information that the file contains, as indicated by the suffix of the name. For instance, filenames ending in .doc are assumed to be Word files, and clicking on such a file will cause Word to be started up to process that file. Filenames ending in .txt are usually associated with Notepad, so another way to start Notepad is to click on a file like lab1.txt. You should be cautious about this mechanism if you don't know what you're doing, however, especially for files of type .exe, which are "executable" files -- programs -- unless you know exactly what will happen.
Using Windows Explorer
Both
the My Computer icon, and the Save (and Save As... or Open)
Dialog box allow you to look through folders and find files. If
you want to move files around, however, or find a program and
start it, then Windows Explorer (not to be confused with Internet
Explorer, the browser) is much more convenient.
Use the Start Menu to find and start Windows Explorer; it
will usually be under Programs or Accessories.
(You can also type "explorer" in the Run dialog box.)
Explorer gives a split-screen view of the file system. To the left is the entire folder hierarchy. When you click on a folder, its contents will be displayed on the right. Notice that some folders have +'s or -'s next to them. This means that the folder has subfolders. If it is a plus, then Explorer is hiding the subfolders. If it is a minus, then you should see the expanded list of subfolders. By clicking on the + or -, you can flip between the condensed + view and the expanded - view.
-
Find the file lab1.txt by clicking "Desktop".
The various programs for displaying directories normally give an almost worthless visual display of icons. You can see much more useful information by selecting View, then Details. You can also sort the items in order by date or size or type, either by selecting View, then Arrange Icons, or by clicking on the corresponding column heading.
In spite of its name, Explorer is most useful when you already know approximately where you're going in the file system. If you know even part of the name of a folder or file, however, you can often find it most easily with a different program. Select Start, then Search, then "For Files or Folders...".
You are now going to use Find Files and Explorer to find some interesting files (and some boring ones too, but that's life). Do the following operations.
- The "desktop" is really a folder in the file system somewhere. Find out the full real name of the directory that holds your file lab1.txt. Enter the result in lab1.txt on a single line.
- As mentioned above, executable programs are stored in files whose names end in .exe. Find all such files on the C: drive by searching for filenames that contain the letters "exe".
- How many are there? (Hint: There are a lot.) Add a line to lab1.txt.
- Some of these files do not have names that end with .exe. Add the name of one such file to lab1.txt.
- What's the largest executable program? Add a line to lab1.txt with the name and size.
- What's the oldest executable program? Add a line to lab1.txt with the name and date.
- What is the name of the PowerPoint executable?
- Which is bigger: Word or Excel? Add one line with the name of the larger program and its size.
- Cookies are a mechanism for leaving little bits of information on your computer for subsequent retrieval, often for advertising purposes. Find out where cookies are stored on your machine. Add a line to lab1.txt with at least one folder or file name that seems to be cookie-related; no need for more than one. (Cookies are just text, so you can look at them with Notepad if you like.)
- What virus-prevention software is running on the machine? Add a line to lab1.txt. (If this is your own computer and you're not running some antivirus software, you should be -- if nothing else, we take a dim view of people who inadvertently send us viruses -- and the consequences can be a lot more severe than disapproval.)
Add each of these as a line to lab1.txt. Save each time, so in case something bad happens, you still have the info.
At the end of this part, you should have about 11 lines in lab1.txt.
Part 4: Using Unix
What Exactly is Unix?
Unix is an operating system; like Windows, it controls the resources of a computer on your behalf. Unix has been around a lot longer than Windows, and runs on many more different kinds of computers. Many of the Internet and Web services that you will use run on Unix machines, and most of the central computing services at Princeton are based on Unix rather than Windows. The web pages that you will create in the next few labs are also stored in Unix files. So you have to understand at least the rudiments of how to access and use the campus Unix systems. The Linux system that is often mentioned in the press of late is a variant of Unix, so anything you learn about Unix will apply to Linux as well. In fact, OIT maintains a group of Linux systems that you can use.Unix is more reliable than Windows and presents a programmer with better access to the internals of the machine. However, it generally does not provide as visual a user interface. As a result, Unix is often used to support infrastructure functions (the back office) while Windows is prevalent on the desktop.
Mac OS X on Apple computers is also a Unix variant. Although the Mac has an even glitzier graphical interface than Windows, underneath is the full power of Unix, a nice combination. If you're using a Mac, start Terminal and all of the Unix commands described here will run the same.
In this part of the lab, we will see how Unix provides for the permanent storage of your files, since the cluster systems only provide transient storage.
Opening an SSH session
If you are using a public cluster machine, you can't save files on it, since they won't likely be there if you return even a day later. You have to store them in some central location. That central location is a Unix system run by OIT. Files are stored there, and backed up onto other systems as well so you can recover them in case of a disaster. Similarly, your Princeton email inbox is located on a central Unix system, so it can be centrally administered and accessed from any machine on (or off) campus.
Most of the time you can save and retrieve files from the central system without using Unix directly; the Windows H: folder that you saw earlier gives you most of the access you would ever need. And you can read mail just fine from a mailer or a browser on your own PC or Mac.
But sometimes you simply have to get to the machine where the information really is, or you have to use a program that doesn't exist on Windows. For this, we use SSH, which is a program that lets a user on one computer log in and use another computer over a network. SSH stands for "Secure Shell". The important word here is "secure" -- information that travels between your machine and the other system is encrypted, so it can't be eavesdropped by anyone along the way. This is nice if you're exchanging intimate mail messages with a significant other, and it's even nicer if you're sending your password to the other machine! So you should always use SSH if you can.
Unfortunately, SSH isn't always available, and you might have to fall back on a much older and definitely insecure alternative called Telnet. Telnet does not encrypt anything, not even your password, so it's pretty easy for nefarious people to snoop on network traffic, pick up passwords, and then masquerade as you. This is a common security breach at universities. So you should never use Telnet if you can use SSH instead. The cluster machines have SSH, so there's no excuse. You can also get SSH for your own machine from OIT; if you got the standard software distribution, it's already installed. You can also run SSH to get to your OIT account from a Mac.
Given that stern warning, follow these instructions to connect to Arizona (which is a group of OIT computers running Unix).
- Run SSH, which may be on the desktop, or with "Programs | SSH Secure Shell | Secure Shell Client" from the Start menu. If there is no SSH, find and run Telnet in the Start Menu (in "Programs | Accessories | Telnet"). If you can't find it there, you can also use Run in the Start Menu, and type telnet in the dialog box.
- When SSH start, choose File, then Connect.
- Next to "Host Name", type arizona
- Provide your own name for User Name.
- Click on the "Connect" button; you will be asked for your password. You can ignore (No or Cancel) anything else that happens first.
tucson.Princeton.EDU%This says that you are now connected to a Unix computer in the Arizona cluster (flagstaff, phoenix, tucson or yuma) and it's ready to do your bidding.
If the prompt never appears, or if you keep getting a message such as "login incorrect" after several tries, ask a TA for assistance.
Basic Unix Commands
Unix has a very different flavor from Windows. Rather than running a program by clicking on an icon with a mouse, you type the name of the program in a window. Keyboard commands with cryptic names like "ls" and "cd" run programs to help you navigate Unix and can be typed in whenever you see a command prompt like
flagstaff.Princeton.EDU%Behind the scenes, Unix, like Windows, maintains a file system with files and folders (though it calls folders "directories"). When you first log in, you should be in a directory called your "home" directory. This is the directory that holds all of your files, most of which cannot be read or even seen by other users. And it's the same directory that is set up as the H: drive from a PC.
Try the following commands. For each, type the name, then push Enter or Return.
- ls - Lists the contents of the directory you are in; you
can get more information with the command ls -l. (That's
"minus ell", not minus one"; some fonts don't distinguish these as clearly as they
should.) The
ls command is the keyboard equivalent of Explorer.
- mkdir - Makes a new directory.
Type mkdir cos109 now and then hit Enter.
(If you're taking COS 111, type mkdir cos111 instead.)
Now if you try the ls command again, you should see your
new directory show up. Again, this is rather like File /
New Folder in Explorer.
- cd - Change directory. Type cd cos109
(or cd cos111).
This will move you to the directory you just created.
To get back to your home directory, type
cd by itself. You can also type
cd .. to move up one level in the file system, and
you can type pwd to print the name of the
directory you are working in.
- who - Tells you who else is logged into the
same computer as you are.
You will notice that there are lots of other users. One major difference
between Unix and Windows is that Unix supports multiple users running on
the same computer at the same time.
Why use Unix instead of Windows? It largely depends on what task you are trying to do. Windows has an enormous collection of useful programs, many of which have no Unix equivalent, and Windows comes installed on all PC's. Unix is a good environment for writing programs, however, expecially programs that are meant to work on more than one kind of computer, so it is often preferred by programmers. Meanwhile, don't worry if Unix seems strange at first. You won't need to use it very often, though it is helpful to know how to move around. And if you own a Mac, knowing Unix will give you a new way to use your computer.
If you are interested in learning a bit more about UNIX, check out this UNIX primer.
Note: When logged into UNIX, you may have to use the "DEL" key instead of "Backspace" to delete a character.
Exercises:
- Add a line to lab1.txt telling us whether you used SSH or telnet to log in.
- Do ls -l on your home Unix directory, and copy first two lines of result into lab1.txt by Copy and Paste.
- Type the command who | wc. (That character is the vertical bar, not the letter i or ell.) This will tell you exactly how many users are logged into the Unix system (in the first of the three numbers it prints). Add a line to lab1.txt with the answer.
- Look at your Unix directory using Explorer and the H: drive. You should see the same information, albeit in different formats.
Part 5: Email with Pine
Using Pine to read email
Every student has an email address username@princeton.edu, where username is the name you used to log into Windows and Unix. You can read mail sent to that address and send mail to others across the world, using any of several mail programs. Normally, you will use Netscape or Outlook to read mail, or you can use Webmail with your favorite browser.
This section will guide you through using the Pine mail program. Pine, like other Unix programs, is text-based instead of mouse-based. Although it will probably not be your first choice for most email use, Pine has some advantages. It works from any SSH or telnet window; you don't need a browser. It is also not vulnerable to PC viruses, since it runs on Unix and it does not run other programs automatically.
To begin, type pine after the prompt, and push Enter. (This is in an SSH window, remember.) Follow the instructions it gives you for setting up Pine on your account.
If you opened Pine correctly, you should now see a menu with options to compose messages, view messages in current folder and view a list of folders. You can adjust the size of the Pine window as you like.
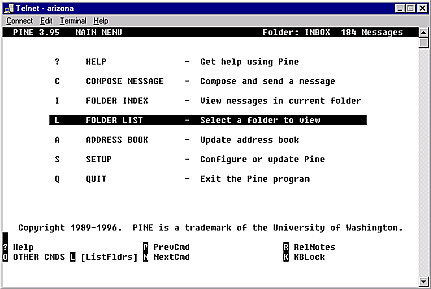
In the top right corner, you should see the name of the currently open folder and how many messages it holds. At first, this should be INBOX, which lets you check all of your new mail. Later, you can make your own folders to organize old messages from different senders.
Because we are still in Unix, you will need to use arrow keys and keyboard commands to navigate Pine. Do not try to use the mouse.
Using the arrow keys, select "Folder Index" and press Enter (or just press "I") to see an index of current email messages.
Even if you have never used email before, there should be at least one message in your INBOX. Using the arrow keys, select the message you would like to read and hit Enter to read it. Notice that many of the available commands are listed at the bottom of the screen. We've explained a few below:
-
M - Returns you to the main menu
I - Returns you to the message index
S - Saves the message in the specified folder and deletes it from your inbox. (Note: You can create a new folder by saving a message to one that doesn't exist.)
D - Deletes a message without saving it
C - Composes a new message to anyone
R - Composes a reply to the sender of the currently selected message
N - Moves to the next message
P - Moves to the previous message
There are many other useful options, but you can discover them on your own with questions and experimentation.
Sending mail with Pine
Now you will send a message to yourself with Pine. The process is pretty self-explanatory, but we'll help you through it this first time. In these instructions, you do not need to use upper-case letters when holding the Ctrl key.
- Press C to compose a new message
- Next to "To:" type in your email address and then hit Enter.
- Press Enter twice to scroll past "Cc:" and "Attchmnt".
- Next to "Subject:" type in a phrase describing the subject of your message and then press Enter again.
- Underneath "Message Text", type in your message.
- When you are finished, hold down Ctrl and press X (this is called Ctrl-X).
- Confirm that you want to send the message by pressing Y.
While you were composing, you may have noticed that the commands
at the bottom of the screen looked like this:

The caret (^) is how Pine reminds you to use the Ctrl key. Thus, ^X is equivalent to Ctrl-X. All of these commands use Ctrl because you need letters like "x" and "c" for your message text.
Leave your SSH window open. Pine will soon notice that new mail has arrived (though it won't be a big surprise, since it's the mail you just sent yourself). There is usually a beep to announce incoming mail.
- When new mail arrives, add a line to lab1.txt that tells how Pine reported that fact.
Once the new mail has been observed, you can delete it, leave Pine by typing "q", and log out of Unix by typing "logout".
Part 6: Transferring files
There are a variety of ways to copy files from one place in a file system to another, or from one file system to another. In Windows, the clearest and most uniform way is to select the file of interest by a single mouse click in a program like Explorer (so it is highlighted), select Copy from the Edit menu or by right-clicking on the filename, then select the folder where you want the copy to appear (so the folder name is highlighted), then select Paste from the Edit menu or by right-clicking.There are shortcut mouse actions for Copy (control-C) and for Paste (control-V), and those are well worth learning. In some situations you can "drag and drop" the file to make a copy, which is very graphical and intuitive. But we generally recommend against drag and drop, since in some contexts, it means "copy" and in others it means "move", and these are not the same operation: "move" means to remove the file from the place it was and put it into a new place, leaving you with a single instance, while "copy" leaves you with two instances.
Make a copy of the file lab1.txt that you are building up on the deskop in your Unix directory as seen through the H: drive:
- Right click on lab1.txt on the desktop, select Copy.
- In Explorer, highlight your cos109 or cos111 directory on the H: drive.
- Select Paste to make the copy.
- After the file is copied (it should take no time at all) verify that it seems to be correct: the file exists in both places, has the same size and sensible modification times.
Verifying the transfer
Here is a chance for you to use your newfound Unix skill to see if the file was copied correctly.
- In your SSH window, go to your cos109 or cos111 directory with the cd command.
- Type ls -l to see that the file is there and about the right size. Is it about the same size as on desktop? Add a line to lab1.txt with the size reported by Unix and the size reported by Windows Explorer (e.g., Unix 395, Windows 1KB).
- Type cd to bring you back to your home directory
- Move to your cos109/111 directory by typing "cd cos109" (or "cd cos111)
- Check the contents of that directory by typing "ls"
You should see the file you just uploaded in this directory if you uploaded it correctly. If you are having problems, ask a TA for assistance.
We have created an experimental program on Unix that will check some aspects of your lab1.txt file. Try it out: run the command
-
~cs109/check1
When you get this far, you've finished the lab. Now go on to learn how to submit your work and shut down Windows.
Part 7: Submitting your work
Submitting your work
IMPORTANT: When you submit labs, or when you send us mail for any other reason, please be sure that you are logged in as yourself, not using a friend's account. If you are using someone else's account, the mail comes from them, and we don't know who sent it!
At the end of most labs, you will be asked to send your results to the appropriate one of cs109@princeton.edu or cs111@princeton.edu by email. Be sure to include everything we asked for. If you have comments or suggestions, we'd be happy to get those as well.
Mail us the text of the file lab1.txt that you have been laboriously creating. It should contain about 17 lines.
- In Notepad, use the mouse to highlight the text and choose "Copy" from the "Edit" menu.
- Using either Pine or Netscape, start a new mail message and paste that text into the message body.
- Send the mail to cs109@princeton.edu or cs111@princeton.edu.
Remember these things as you send your message:
- If you're using Netscape Mail, be sure that your identity is set correctly.
- If you're using Pine, you may be experiencing mouse difficulties. Although you can highlight and copy text from your SSH window, you cannot use the mouse to select where you would like to paste it. Once you've begun your new message, use the arrow keys to move to the message body and then select paste from the Edit menu.
- The subject of your message should say "LAB 1 - Your Name".
- Make any additional comments or observations at the top of the message and then sign it with your name.
- Send a copy of the mail to yourself.
Transferring saved work
In most of these labs, you will save files to the Desktop or elsewhere on the hard drive of a lab computer. Because these computers are public and not meant for private storage, however, you cannot rely on this to save your work. Not only will it be impossible to use the same computer every week, but other students and support staff will erase your files to free up space.
For these reasons, if there are files you have to save from week to week, you must transfer them to your Unix account. Be sure that you've done this properly. Once you know your work is saved on the Unix system, you can remove the files from the public cluster machine; there's no need to remove them from your personal machine if you don't want to.
Logging off of Windows
If you've completed the lab, sent your email to cs109@princeton.edu or cs111@princeton.edu, and transferred your work to your Unix account, then you are finished and ready to log off of Windows.
- Select "Shut Down..." from the Start Menu. Choose "Log Off your-name" and click "OK"